Last Updated: October 28, 2026
Quick Summary
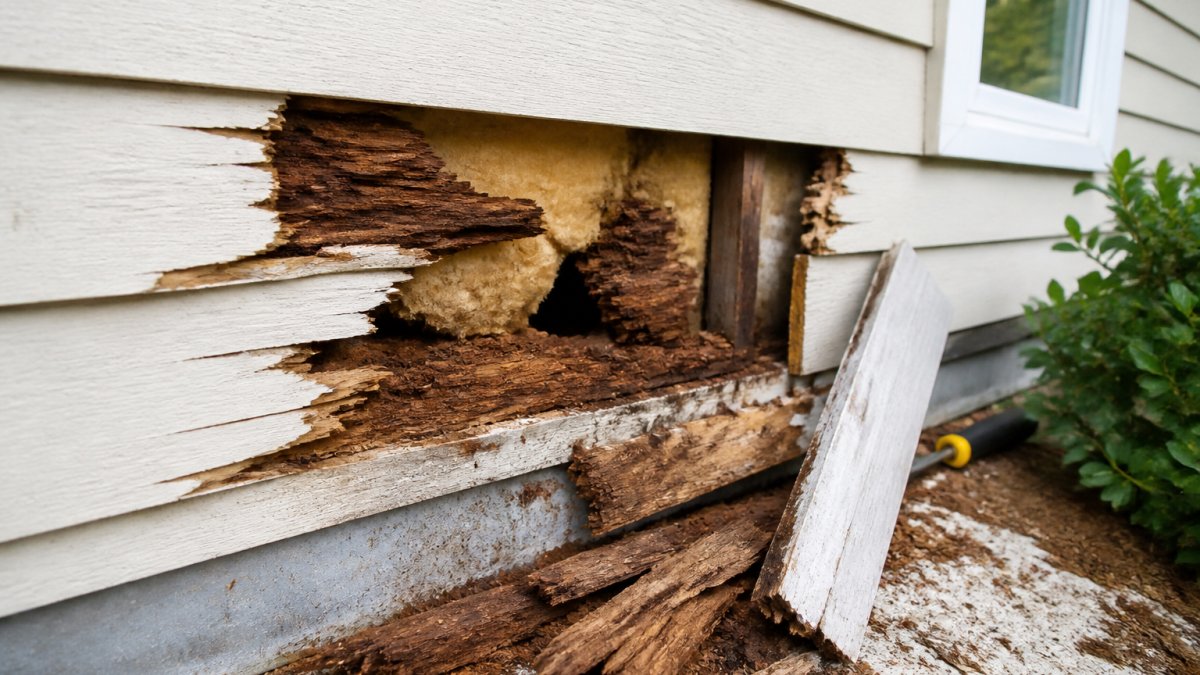
Hidden rot behind siding is wood decay that starts on the back of a board or in the framing and never shows on the painted face until it has spread. Watch for dark staining, peeling paint, warped boards, open gaps, and soft spots that give when you press them with a screwdriver.
- Water usually enters at failed caulk, missing flashing, corner board gaps, and roof-to-wall junctions.
- Probe suspect wood at a shallow angle parallel to the grain; resistance means sound wood.
- The press test confirms soft wood but does not tell you why the wood is soft.
- A repair is not done until the water source is fixed, or the new board rots too.
- Homes built before 1978 may have lead paint on trim and siding that becomes a dust hazard.
Table of Contents
- Why Hidden Rot Behind Siding Goes Unnoticed
- 1. Early Signs of Wood Rot You Can Spot From the Ground
- 2. How to Tell If Siding Is Rotting: Warping, Gaps, and Soft Spots
- 3. Hidden Water Damage Behind Siding: How Water Gets In
- 4. A Safe Step-by-Step Inspection Method
- 5. Distinguishing Rot From Other Causes
- 6. Repairing Rot Behind Siding: Scope and Material Considerations
- Schedule a Free Rot Inspection Before Damage Spreads
- Frequently Asked Questions
Why Hidden Rot Behind Siding Goes Unnoticed
Hidden rot behind siding is wood decay that starts on the back of a board or in the framing and never shows on the painted face until it has spread. The reason is simple: water gets in where you can’t see, and it stays there.
Siding is a rain screen, not a seal. Water that slips past a joint, a caulk line, or a window trim gets trapped against the sheathing. Wood stays wet for weeks. Decay fungi move in, and the damage grows inward.
The signs of hidden rot behind siding rarely appear where you’d expect. They show up low, near the roofline, and around anything that penetrates the wall.
USDA Forest Service guide to wood decay in structures
1. Early Signs of Wood Rot You Can Spot From the Ground
Start with a slow walk around the whole house. Binoculars help for the upper walls.
Discoloration and Dark Staining
Look for dark streaks, brown patches, or a green-black film on the siding. Stain that runs downward usually means water is traveling behind the panel and leaking out at a seam.
Fresh stain after rain, then fading in dry weather, points to a leak that’s still active. Stain that never changes is often old damage that was never fixed.
Peeling, Bubbling, or Cracked Paint
Paint failure in one small patch is a moisture signal. Paint traps water vapor trying to escape from wet wood, so it lifts and blisters from behind.
Check the pattern. If paint is peeling along the bottom edge of every panel, water is sitting behind the siding. If it’s peeling around a window frame, the trim or flashing is the likely entry point.
2. How to Tell If Siding Is Rotting: Warping, Gaps, and Soft Spots
Learning how to tell if siding is rotting comes down to three checks: shape, fit, and feel. Warped boards, open gaps, and soft wood almost always mean decay.
Here’s what to watch for:
- Warping and buckling: panels bow out or ripple instead of sitting flat
- Bulging: a section pushes outward, often where water is trapped behind it
- Gaps between panels: joints open up or panels pull away from trim
- Cracked or split boards: cracks run along the grain or open at nail heads
- Soft spots: wood gives when you press it with a screwdriver
Run a hand along the lower edges of the siding. A hollow sound or a slight give is a warning. Swelling matters too. Wood that has soaked up water stays fatter than its neighbors long after the rain stops.
3. Hidden Water Damage Behind Siding: How Water Gets In
Hidden water damage behind siding almost always starts at a penetration point. Water needs a gap, and houses have plenty of them.
The usual entry points:
- Failed caulk at window and door trim
- Missing or rusted flashing above windows and doors
- Gaps at corner boards and where two wall sections meet
- Roof-to-wall junctions and the roofline
- Chimney flashing and masonry joints
- Nail holes, outlets, and hose bibs
- Gutters that overflow or dump water against the wall
Look uphill from any stain. Water rarely enters where the damage shows. It enters higher and travels down the framing until something stops it.
A musty odor inside the house, especially in a closet or near an exterior wall, is another clue. Smell travels through the wall cavity before the damage is visible outside.
4. A Safe Step-by-Step Inspection Method
A ground-level walk-around is a screening tool, not a diagnosis. The method below is a screening approach for checking for possible hidden rot. Budget about an hour for a single-story wall section; add time for ladders and roof edges.
What you’ll need: a flat-head screwdriver or awl, a pin-type moisture meter, a notepad or phone camera, binoculars, work gloves, safety glasses, and a ladder only if you are comfortable on one and it is rated for your weight. Add a respirator (N95 or better) and disposable gloves if you will probe suspect wood, and eye protection any time you are working overhead.
Never probe near wiring, gas lines, or anything you cannot see behind. Do not push a tool into a wall cavity. If a spot feels soft over a large area, stop and call a professional. Do not climb on a wet, mossy, or pitched roof; inspect rooflines from the ground with binoculars.
- Walk the perimeter at ground level. Note stains, warping, and paint failure on a simple sketch of each wall. Use binoculars for gables and second-story walls.
- Check the low zones first. Water collects near the foundation, so probe the bottom two rows of siding and the trim above the foundation.
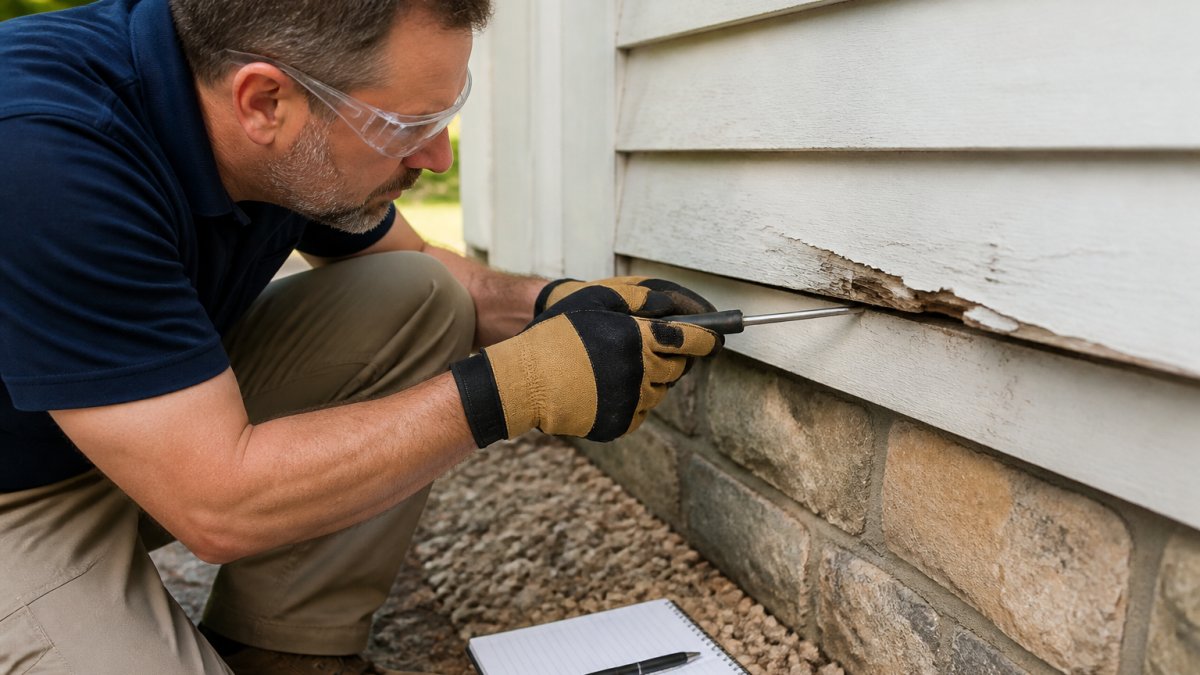
- Probe suspect spots at a shallow angle. Push the screwdriver into the wood parallel to the grain, not straight in. Resistance means sound wood. A spongy or crumbly feel means rot. Withdraw the tool and mark the spot.
- Inspect every penetration. Windows, doors, corner boards, outlets, hose bibs, and the chimney get a close look. Look uphill from any stain; water rarely enters where the damage shows.
- Follow the roofline and gutters. Overflow, missing drip edge, and bad flashing are common culprits. Check that downspouts discharge away from the wall.
- Look inside. Check the attic, interior walls near exterior stains, and closets on exterior walls for dampness, staining, or musty odor.
- Photograph and date everything. You will want the record when you call for a repair or file an insurance claim.
The Press Test and Moisture Confirmation
The press test is a quick way to confirm soft wood. Press firmly with a screwdriver handle or your thumb. Sound wood springs back. Rotten wood dents and stays dented. The press test tells you the wood is soft; it does not tell you why.
When you remove a siding board to inspect, cut it at a stud location and save the piece. You can reinstall it after the repair, and you avoid creating a new water entry point. Seal any opened seam with a compatible flashing tape or caulk before reinstalling.
5. Distinguishing Rot From Other Causes
Not every stain is rot, and not every soft spot is decay. Getting this wrong wastes money on the wrong repair.
| What you see | Likely cause | How to confirm |
|---|---|---|
| Dark stain, musty smell | Active rot or mold | Moisture meter reading, probe test |
| Peeling paint in one patch | Trapped moisture | Check flashing and caulk above |
| Warped boards, no soft wood | Sun and heat damage | Probe test comes back firm |
| White fuzzy growth | Mold, not necessarily rot | Wipe test, moisture reading |
| Cracked boards at nail heads | Fastener movement, settling | Check for water staining nearby |
Dry rot is a term people use loosely. True dry rot fungi can spread through dry wood, but the wood still needed moisture to start. Treat any rot as a moisture problem first.
Mold on the surface is a symptom. It tells you the wood has been wet. It doesn’t tell you how deep the decay goes. Only probing and a moisture reading answer that.
6. Repairing Rot Behind Siding: Scope and Material Considerations
Repairing rot behind siding ranges from a small patch job to replacing sheathing and framing. The scope depends on how far the decay has spread and what the siding material allows. The repair is not done until the water source is fixed. Replace the wood without fixing the flashing or caulk, and the new board rots too.
How Far the Repair Can Spread
A common pattern is a small trim leak that has been running for years. The trim looks fine, the siding looks fine, and the framing behind the window is decayed. That is why a repair estimate based only on what is visible from outside is unreliable.
Material-Specific Considerations
- Trim and fascia: replaced, not patched, because they carry water away from the wall.
Health and Safety Considerations
Opening an exterior wall can expose you to mold, lead paint, and asbestos. Mold is common in wet wall cavities; wear an N95 respirator, gloves, and eye protection, and isolate the work area from the interior. Homes built before 1978 may have lead paint on trim and siding; disturbing it without containment creates a dust hazard. Older caulk, flashing, and siding materials may contain asbestos. If the home is older and you are unsure, have the material tested before you cut.
EPA guidance on lead paint and renovation
FEMA guidance on moisture and mold after water intrusion
For a closer look at how rot, mold, and insects attack a log home, see our guide on protecting your log home from damage. For the full picture on exterior wood, review our log home restoration options.
Schedule a Free Rot Inspection Before Damage Spreads
If you’ve spotted any of the signs of hidden rot behind siding, don’t wait for the next storm to make it worse. Midwest Maintenance LLC has handled wood and masonry restoration since 2008, and we offer free consultations. Our team specializes in log home restoration and chinking.
Get started with Midwest Maintenance LLC and Book your log home maintenance visit today.
Frequently Asked Questions
Can siding look fine while the wood underneath is rotting?
Yes. Siding can look intact on the surface while hidden rot spreads underneath. Watch for visible clues like peeling paint, dark staining, or panels that feel soft when pressed.
What are the early signs of wood rot behind siding?
Look for warping, buckling, or bulging panels, gaps between boards, peeling or bubbling paint, and dark discoloration.
Does homeowners insurance cover rotting wood siding?
Most policies exclude rot that develops gradually from poor maintenance, but may cover rot tied to a sudden event like a storm or burst pipe. Document the damage with photos and review your policy wording. Ask your insurer whether the cause is covered before starting repairs, since untreated moisture intrusion is typically treated as a maintenance issue.
What should you do if you find soft or damaged wood behind siding?
Stop probing further and photograph the area. For large areas or log homes, contact a restoration professional.


Comments are closed